On todays episode of Getting Dirty with the Dog, we're going to install an axle-back exhaust.
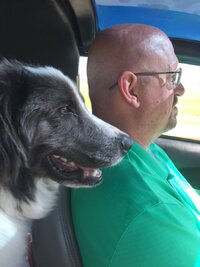
I'm your host, Rowdy, the Worlds Best Navigator. And this is my friend Zoe, AKA Slutty McHoebag, the worlds most promiscuous cat.


Jeeps are great. Wranglers are especially awesome. But stock exhaust systems... not so much. Whether you're looking for a bit more power, a different sound, a different look, or any combination of those, the aftermarket has got you covered. In this case, I wanted the look of a dual-outlet system, a better exhaust note, and a maybe a couple extra ponies.
The procedure will be pretty much the same for any system, but I chose the Flowmaster Outlaw. This is an a axle-back solution, but cat-back options are readily available from many manufacturers. Let's get started.
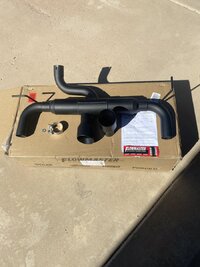
Flowmaster includes all the parts needed, and those are pretty few. The muffler assembly, a band clamp, tips, instructions, and a bunch of stickers. Because everyone knows each sticker is worth 5HP, right? I never actually read the instructions, because Manly Men don't need directions, right?

The entire system has a nice black powder coating finish, and looks great under my black bumper.
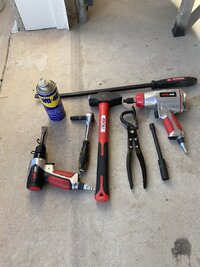
Theoretically, the only tools needed for this swap are: 16mm socket, 10mm socket, extension, ratchet, some WD-40 and a pair of exhaust hanger removal pilers. Theoretically. I'll get more into that in a minute.

Before I started, I decided to get a clip of the stock exhaust. I know, you've all heard your own. My reasoning is that shooting before and after clips with the same camera at the same distance provides a good comparison.
If you're the sort that has a lift in your garage, this is the time to use it. Otherwise, you may want to jack up your Jeep and secure it on jack stands. Please don't be that nitwit who works under a vehicle when it's on the jack. If you are, and you end up in my ER, I will do my best to help you, but I will also give you all sorts of crap for being foolish. I just laid on the concrete and butt-walked under the thing.
The first step is removing the OEM muffler. There are two rubber hangers, one on either side. You'll want to leave those attached to the vehicle and remove them from the muffler. This is where the "theoretically" part of the tool list comes into play.
Like most, I watched a few YouBoob video How-Tos, mostly to hear how various options sound, but also to see if there were any tips from the oh-so-knowledgable folks. They pretty much all showed the installer reaching up there with the exhaust hanger removal pliers, giving a squeeze, and popping the thing right out. I had never used this tool before, so when I ordered the exhaust, I ordered a pair. I found that there are two problems with this method.
First, the hanger on the drivers side is too close to the frame for the pliers to fit. Not going to happen.
Second, the installers must have really good grip strength. Now, I know I'm old, and I will freely admit that chemotherapy has done a number on my fitness. But after 50+ years in the martial arts, including 25 teaching, I'm not totally feeble even now.
So exit the pliers and enter a pry bar. That made short work of removing the muffler from the hangers.
The next step is to remove the band clamp holding the muffler to the intermediate pipe. The OEM muffler connects to the intermediate pipe just after it arcs over the rear axle. It is secured with a band clamp. I had already liberally sprayed WD-40 on the area. Use the 16mm socket and extension to loosen the clamp. Oh, wait. There's 9-10 years of rust welding. That's ok, I'm sure you can bust it loose. Me, I used an impact gun. Because work smarter, not harder.
Here's where that "theoretical" tool list rears it's ugly head again.
All the videos I watched say to grab the muffler and start wiggling/jiggling/twisting and slip the pipes apart. Then they turn around and do just that. Easy. 30 second job. In hindsight, I noticed that all of those clips had a skip at about that point. This is, no doubt, where they edited out the actual getting the thing broke loose part of removing the muffler. Because 9-10 years of rust welding...
I tried the wiggle/jiggle/twist method. Yeah. That didn't do anything. I tried whacking on the muffler with a hammer. Nothing. I tried a pray bar. Nope. I whacked on it with a bigger hammer. Still nothing. I grabbed a propane torch to see if heating (expanding) and rapid cooling (contracting) the joint would break the rust loose. Not a chance. Ultimately, I grabbed my air hammer and a nice chisel and started pealing back the pipe. That worked.
![IMG_5559[1].JPG IMG_5559[1].JPG](https://wranglerjkforum.net/data/attachments/122/122617-242e9c5f5f17145daf8eb65b272d27a1.jpg?hash=JC6cX18XFF)
The OEM exhaust has a resonator just downstream of the cats. There is a fine line between a resonator and some mufflers. So I grabbed an exhaust clip with the stock cats, resonator and intermediate pipe. A muffler delete is free, and some people like the sound.
Now on to the actual install part of our installation. Put a little anti-seize on the supplied band clamp. Place the clamp over the connecting pipe on the muffler. Now slip that over the end of the intermediate pipe. I used a wire brush to remove some of the surface rust, but I really don't think that was actually necessary. Position the clamp and snug it down. Not too tight, because you're going to want to tweak the connection to get the tips level and such. I used my 16mm socket, extension, and impact gun, but a plain ratchet will work just fine.
Now grab the tips, slip them on, and position them to your liking. This is easiest if you snug the pinch bolts. Once everything is positioned, crank down the band clamp, re-check the positioning of the tips, because they probably shifted a little. Crank them down. Use a ratchet, not your impact gun, otherwise your aftermarket exhaust might need an after-aftermarket bolt...
Now try it out. Stationary:
Acceleration:
I don't have a lift in my garage, so it probably won't come as a shock to learn I don't have a dyno, either. However, I did do some acceleration tests on a deserted road near my home in the stock configuration, and then again after the exhaust. I use an app called DynoChart for the iPhone. I have compared it to actual dyno runs on my Vette, and it is reasonably accurate.
The current setup includes a Bulldog GT Platinum High Octane tune, the Rough Country cold air intake, and the Flowmaster axle-back. Adding up the manufacturers claims, this should result in a gain of about 80HP. That would be awesome, but I think we all know that the manufacturers are a bit...optimistic...in their claims.
According to DynoChart, I have added 30-35HP. I'll take it.
I'm your host, Rowdy, the Worlds Best Navigator. And this is my friend Zoe, AKA Slutty McHoebag, the worlds most promiscuous cat.


Jeeps are great. Wranglers are especially awesome. But stock exhaust systems... not so much. Whether you're looking for a bit more power, a different sound, a different look, or any combination of those, the aftermarket has got you covered. In this case, I wanted the look of a dual-outlet system, a better exhaust note, and a maybe a couple extra ponies.
The procedure will be pretty much the same for any system, but I chose the Flowmaster Outlaw. This is an a axle-back solution, but cat-back options are readily available from many manufacturers. Let's get started.
Flowmaster includes all the parts needed, and those are pretty few. The muffler assembly, a band clamp, tips, instructions, and a bunch of stickers. Because everyone knows each sticker is worth 5HP, right? I never actually read the instructions, because Manly Men don't need directions, right?

The entire system has a nice black powder coating finish, and looks great under my black bumper.
Theoretically, the only tools needed for this swap are: 16mm socket, 10mm socket, extension, ratchet, some WD-40 and a pair of exhaust hanger removal pilers. Theoretically. I'll get more into that in a minute.

Before I started, I decided to get a clip of the stock exhaust. I know, you've all heard your own. My reasoning is that shooting before and after clips with the same camera at the same distance provides a good comparison.
If you're the sort that has a lift in your garage, this is the time to use it. Otherwise, you may want to jack up your Jeep and secure it on jack stands. Please don't be that nitwit who works under a vehicle when it's on the jack. If you are, and you end up in my ER, I will do my best to help you, but I will also give you all sorts of crap for being foolish. I just laid on the concrete and butt-walked under the thing.
The first step is removing the OEM muffler. There are two rubber hangers, one on either side. You'll want to leave those attached to the vehicle and remove them from the muffler. This is where the "theoretically" part of the tool list comes into play.
Like most, I watched a few YouBoob video How-Tos, mostly to hear how various options sound, but also to see if there were any tips from the oh-so-knowledgable folks. They pretty much all showed the installer reaching up there with the exhaust hanger removal pliers, giving a squeeze, and popping the thing right out. I had never used this tool before, so when I ordered the exhaust, I ordered a pair. I found that there are two problems with this method.
First, the hanger on the drivers side is too close to the frame for the pliers to fit. Not going to happen.
Second, the installers must have really good grip strength. Now, I know I'm old, and I will freely admit that chemotherapy has done a number on my fitness. But after 50+ years in the martial arts, including 25 teaching, I'm not totally feeble even now.
So exit the pliers and enter a pry bar. That made short work of removing the muffler from the hangers.
The next step is to remove the band clamp holding the muffler to the intermediate pipe. The OEM muffler connects to the intermediate pipe just after it arcs over the rear axle. It is secured with a band clamp. I had already liberally sprayed WD-40 on the area. Use the 16mm socket and extension to loosen the clamp. Oh, wait. There's 9-10 years of rust welding. That's ok, I'm sure you can bust it loose. Me, I used an impact gun. Because work smarter, not harder.
Here's where that "theoretical" tool list rears it's ugly head again.
All the videos I watched say to grab the muffler and start wiggling/jiggling/twisting and slip the pipes apart. Then they turn around and do just that. Easy. 30 second job. In hindsight, I noticed that all of those clips had a skip at about that point. This is, no doubt, where they edited out the actual getting the thing broke loose part of removing the muffler. Because 9-10 years of rust welding...
I tried the wiggle/jiggle/twist method. Yeah. That didn't do anything. I tried whacking on the muffler with a hammer. Nothing. I tried a pray bar. Nope. I whacked on it with a bigger hammer. Still nothing. I grabbed a propane torch to see if heating (expanding) and rapid cooling (contracting) the joint would break the rust loose. Not a chance. Ultimately, I grabbed my air hammer and a nice chisel and started pealing back the pipe. That worked.
![IMG_5559[1].JPG IMG_5559[1].JPG](https://wranglerjkforum.net/data/attachments/122/122617-242e9c5f5f17145daf8eb65b272d27a1.jpg?hash=JC6cX18XFF)
The OEM exhaust has a resonator just downstream of the cats. There is a fine line between a resonator and some mufflers. So I grabbed an exhaust clip with the stock cats, resonator and intermediate pipe. A muffler delete is free, and some people like the sound.
Now on to the actual install part of our installation. Put a little anti-seize on the supplied band clamp. Place the clamp over the connecting pipe on the muffler. Now slip that over the end of the intermediate pipe. I used a wire brush to remove some of the surface rust, but I really don't think that was actually necessary. Position the clamp and snug it down. Not too tight, because you're going to want to tweak the connection to get the tips level and such. I used my 16mm socket, extension, and impact gun, but a plain ratchet will work just fine.
Now grab the tips, slip them on, and position them to your liking. This is easiest if you snug the pinch bolts. Once everything is positioned, crank down the band clamp, re-check the positioning of the tips, because they probably shifted a little. Crank them down. Use a ratchet, not your impact gun, otherwise your aftermarket exhaust might need an after-aftermarket bolt...
Now try it out. Stationary:
Acceleration:
I don't have a lift in my garage, so it probably won't come as a shock to learn I don't have a dyno, either. However, I did do some acceleration tests on a deserted road near my home in the stock configuration, and then again after the exhaust. I use an app called DynoChart for the iPhone. I have compared it to actual dyno runs on my Vette, and it is reasonably accurate.
The current setup includes a Bulldog GT Platinum High Octane tune, the Rough Country cold air intake, and the Flowmaster axle-back. Adding up the manufacturers claims, this should result in a gain of about 80HP. That would be awesome, but I think we all know that the manufacturers are a bit...optimistic...in their claims.
According to DynoChart, I have added 30-35HP. I'll take it.


