On todays episode of Getting Dirty with the Dog, we're going to install a spare tire carrier brake light.
I'm your host, Rowdy, and it makes me sad when the Broncos do poorly.

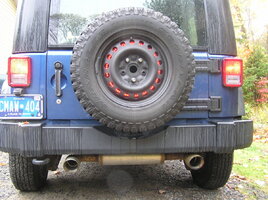
Both our Jeeps have Smittybilt spare tire carriers on them. But the third brake light vibrates annoyingly. Doesn't bother her at all, but it irritates the crap out of me. So today, we're going to remove that light and replace it with THIS, mounted behind the spare tire.
This product is designed more to supplement your existing light than to replace it. So installation was slightly different. Tools needed for the normal install are a lug wrench (or impact gun) to remove your spare tire and some electrical tape. Added tools for this install are wire cutters, wire strippers a couple self-solder butt splice connectors, a heat gun, a 6mm hex key, a 10mm wrench and socket and a ratchet.
Start by removing your spare tire from the carrier. I have Rockstar II wheels, so that means using a 6mm hex key to remove the center cap, then use the keyway socket supplied with the wheels to unbolt the spare. Here is where we deviate.
For the standard install, you will now put the brake light disk on your wheel studs, remove the back cover of your OEM brake light, and disconnect the wiring. You will then use the two connectors on the new brake to connect the light in series with the OEM light. Then put the cover back on the OEM light. But for us...
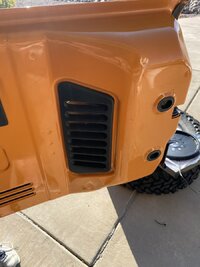
Now open the tailgate. Remove the plastic grill. It's held in by a couple of panel clips along the long edge. Pop them out with your hand, a flathead screwdriver, or a trim panel tool.

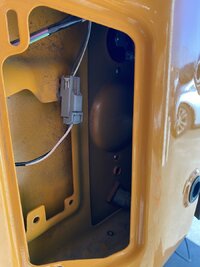
Behind this grill you will see the connection between your third brake light and the vehicle. Squeeze the tab and disconnect it.

Use your 10mm wrench and socket (you will probably need to run to the store and buy another) to remove the third brake light from the top of the Smittybilt carrier. Throw it in the trash and be thankful that you won't have to listen to it vibrate any more. Place the brake light disk on the wheel studs. You will notice at this point that the manufacturer didn't include anything to hold the disk in place when the spare tire has been removed. I'm sure that saved them a penny or two. If you have some brake rotor or exhaust hanger clips, they will work perfectly. I just put one on the bottom stud and all is good.

Now clip the wire before it splits into two plugs. Toss that junk. Dig the OEM third brake light back out of the trash, because you just remembered you need that OEM connector. Clip it off. Use your self-solder butt splice connectors (these are the neatest thing since sliced bread) to put the OEM plug on the aftermarket wires. Pass the plug back into the inside of the tailgate and make the connection. Test the light, before the wheel goes back on. As always with an LED wiring project, remember that although regular lights don't give two hoots about polarity, LEDs do. If it doesn't work, you probably spliced the wires backwards. Go fix it. Test it again. Put the grill back, put your tire back in place, and clean up your mess.

I'm your host, Rowdy, and it makes me sad when the Broncos do poorly.

Both our Jeeps have Smittybilt spare tire carriers on them. But the third brake light vibrates annoyingly. Doesn't bother her at all, but it irritates the crap out of me. So today, we're going to remove that light and replace it with THIS, mounted behind the spare tire.
This product is designed more to supplement your existing light than to replace it. So installation was slightly different. Tools needed for the normal install are a lug wrench (or impact gun) to remove your spare tire and some electrical tape. Added tools for this install are wire cutters, wire strippers a couple self-solder butt splice connectors, a heat gun, a 6mm hex key, a 10mm wrench and socket and a ratchet.
Start by removing your spare tire from the carrier. I have Rockstar II wheels, so that means using a 6mm hex key to remove the center cap, then use the keyway socket supplied with the wheels to unbolt the spare. Here is where we deviate.
For the standard install, you will now put the brake light disk on your wheel studs, remove the back cover of your OEM brake light, and disconnect the wiring. You will then use the two connectors on the new brake to connect the light in series with the OEM light. Then put the cover back on the OEM light. But for us...
Now open the tailgate. Remove the plastic grill. It's held in by a couple of panel clips along the long edge. Pop them out with your hand, a flathead screwdriver, or a trim panel tool.

Behind this grill you will see the connection between your third brake light and the vehicle. Squeeze the tab and disconnect it.

Use your 10mm wrench and socket (you will probably need to run to the store and buy another) to remove the third brake light from the top of the Smittybilt carrier. Throw it in the trash and be thankful that you won't have to listen to it vibrate any more. Place the brake light disk on the wheel studs. You will notice at this point that the manufacturer didn't include anything to hold the disk in place when the spare tire has been removed. I'm sure that saved them a penny or two. If you have some brake rotor or exhaust hanger clips, they will work perfectly. I just put one on the bottom stud and all is good.

Now clip the wire before it splits into two plugs. Toss that junk. Dig the OEM third brake light back out of the trash, because you just remembered you need that OEM connector. Clip it off. Use your self-solder butt splice connectors (these are the neatest thing since sliced bread) to put the OEM plug on the aftermarket wires. Pass the plug back into the inside of the tailgate and make the connection. Test the light, before the wheel goes back on. As always with an LED wiring project, remember that although regular lights don't give two hoots about polarity, LEDs do. If it doesn't work, you probably spliced the wires backwards. Go fix it. Test it again. Put the grill back, put your tire back in place, and clean up your mess.


