On todays episode of Getting Dirty with the Dog, we're going to install a Rearview Mirror/Dash Cam/Backup Camera Thingy.
I'm your host, Rowdy, and I might have a caffeine problem.
Let's get started.
I'm pretty sure that nobody, ever, anywhere in the world, has said "man, the visibility out the rear of these JK Wranglers is awesome!" Between the glass-mounted rear wiper motor, spare tire, and 3rd brake light, it's pretty crowded back there. Relocating the brake light to accommodate larger wheels and tires doesn't exactly help.
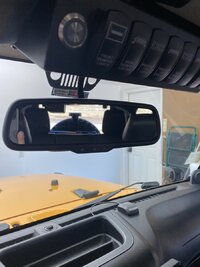
So what to do? As usual, the aftermarket has answers.
There are a number of high-end cars on or coming to market that replace all of the mirrors with cameras. Even budget-minded Kia is joining in. So after some time spent researching, I ordered THIS. The Wolfbox G840S. As usual, I will talk about installing this specific item, but other models or brands will likely be very similar.
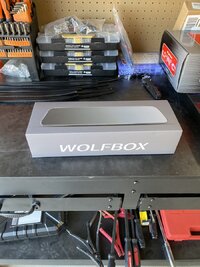
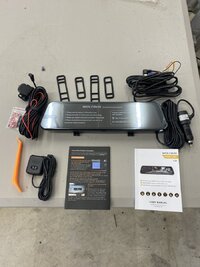
The G840S currently sells for $120 on Amazon. It provides front and rear HD cameras, GPS compass, speed, and location information (but not navigation), loop recording, and has impact sensors to trigger recording of events when the vehicle is parked. The box comes with everything needed for an installation - the smart mirror and mounting straps, GPS antenna, rear camera and cable, power outlet adapter, a trim panel tool, and a fairly well done owners manual.
My immediate thought was "why the heck would anybody install this and plug it into the power outlet? This is clearly intended as a permanent installation, so doesn't hard wiring it make more sense?" The owners manual deals with this. Just send an email to the included address with your Amazon (or whatever) order number and they will send you a free hardwire kit. That's nice, but it does mean waiting. It took 5 days to get that kit. You could certainly use the power outlet adapter while you wait, but I don't like kludges. So, that was the first delay. I did suggest to Wolfbox in my email that they consider replacing the adapter with the hardwire kit as the default or, better yet, include both options in the box. That's my first suggestion for improvement.
I don't know what the installation instructions say to do first, because I'm a Macho He-Man, so I never read them.
My first step was running the power. To get the wiring into the engine bay, use the trim removal tool to pop out the panel on the passenger side of the dash. If you don't have one, you can use a small flathead screwdriver, but be careful not to damage the panel. At the top of the space behind this panel, you will see a hole that has been filled with expanding foam. This provides an easy way to pass wires out of the passenger compartment. There is one of these on the drivers side too, if you ever need access on that side.
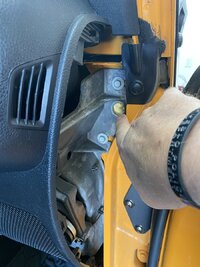
There are, obviously, multiple methods of getting wires through here. My solution was very high tech. I poked it with a sharp stick.
The hole is maybe 1/2" in diameter. The power wire has two fuse connections on the end. I taped them to the stick, but the resulting bundle was too thick to pass through the hole. So I taped the middle of the wire to the stick, pulled that bundle through, and then pulled the rest of the wire through.
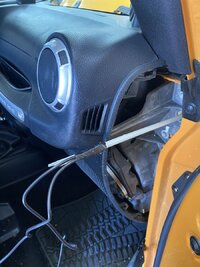
At this point, let me caution you to be sure which end you're taping to the stick. Because if, after wiggling and jiggling to get the connection end through the little hole, you discover that you just pulled the USB-C end through into the engine bay, you're going to feel stupid. Don't ask how I know, just take my word for it.
The mirror needs to be on when you're driving, so it needs a switched power source. But in order to shut down everything except the impact sensor recording, it also needs a constant source. It does have a power level sensor, so if your battery drops to 11V it will turn off to avoid leaving you stranded with a dead battery. The hardwire kit includes two fuses to make these connections. They are, unfortunately, not the sort that allow you to piggyback on an existing fuse. Nor can they be replaced. If they blow, you will need to splice in a replacement. This is my second suggestion to the folks at Wolfbox.
So we need two empty fuse slots. The JK TIPM is not exactly packed with empty fuse slots. You could replace the fuse in an existing circuit, but you'd need to be certain that the combined load was lower than the single fuse.
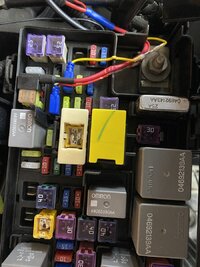
I spent some time reading the diagram and confirming things with my multimeter, and I ended up using M4 (constant) and M9 (switched). Your mileage may vary. Check your local listings. Void where prohibited. In the picture, you can also see the much nicer, dual fuse piggyback connector supplied by Voswitch.
There is a small power converter circuit box on the cable to drop the vehicles 12V power to the 5V used by the mirror. Installed the way I did it, this box ends up inside the cabin, behind the end panel of the dash. If you come from the engine bay into the cabin, it'll be right behind your battery. I used a couple zip ties to secure it so it wouldn't rattle. Then run the USB-C end of the cable (the one you DID NOT run into the engine bay by mistake...) up behind the A Pillar trim and across the top of the windshield, tucking it behind the trim as you go. I found this easier to do if I unhooked the front of the Freedom Panel. No need to remove it, just disconnect the front edge so you can lift it enough for your sausage fingers to fit in there.
While you're in there, mount the GPS antenna. I used 3M foam tape to stick it on the dash, right next to the passenger A pillar. Run the wire right alongside the power wire.
![IMG_5631[1].JPG IMG_5631[1].JPG](https://wranglerjkforum.net/data/attachments/122/122842-50fa902f7a547b40a6e60910cdbefeb6.jpg?hash=UPqQL3pUe0)
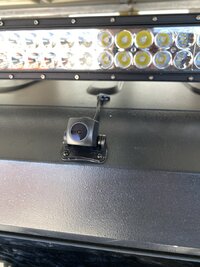
Next up: the rear camera. It can be mounted pretty much anywhere you like. I think it is most commonly placed above the rear license plate, but since the JK plate is way over to the side, this seems less than ideal. I have seen people mount cameras on the third brake pedestal, aimed through the wheel. My choice was centered on the roof, under the rear light bar. I used the supplied 3M double sided tape to mount it, then used that as a template to drill a couple screw holes. The hardtop is two layers with a gap between them at the rear, so there is no concern for the screws poking into the rear of the cabin. The foam tape should seal just fine, but I also put a dab of clear silicone on both screws. No leaks allowed. I then used a hole saw to provide passage for the wire into the cabin. I drilled this a few inches forward, where the hardtop is single layer. Because lining up the holes in the double layer part would be a pain. I used a rubber grommet to seal the hole, and I filled the top with clear silicone. Again, no leaks allowed.
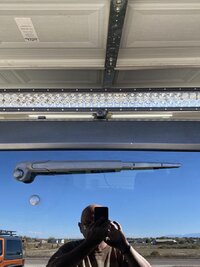
Now we need to run the video cable from the camera to the mirror. I've been through this a couple times, wiring the rear light bars on our Jeeps, and it's not difficult. The OEM wiring for the wiper motor and such comes down the drivers side and under the carpeting. I've read a lot of how-to articles that recommend taking off the plastic trim around the rear down-leg of the roll cage. Don't bother. You can just pop the carpeting out from under the lip of the body and get enough room. Route the cable up into the rear seat floor, then put the carpet back in place. From the rear floorboard, use your fingers and a trim tool or screwdriver to tuck the wire under the plastic door sills. At the front, tuck it behind the kick panel. Pop out the end panel of the dash (just like you did on the passenger side for power) and run the wire up through that, behind the A pillar trim, and across the top of the windscreen.
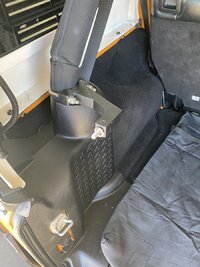
Just FYI, that's my Hi Lift jack mount in that picture. Super nice. And since it's inside, I don't worry about the jack growing legs while I'm in a parking lot.
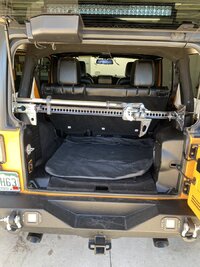
That's not a How To I intend to write. If you can't manage that install without a guide, you shouldn't be driving.
Now it's time to mount the heart and soul of the thing - the Smart Mirror. The mirror has a forward facing camera mounted on the drivers side. This means it is somewhat wider than the OEM mirror, and that it will be mounted offset to the drivers side to allow for the camera. It is mounted over your existing mirror using what are, basically, rubber bands. That doesn't sound very secure, but if you look at the unboxing photo, you will see that they are actually pretty robust rubber bands. If they stretch over time, they will be easy to replace. If that happens, I will think of a better way. Once mounted, you just need to plug in the three cables and you're good to go.
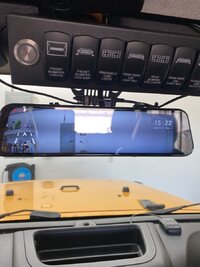
Across the top from left to right, you will find the USB-C power socket, the rear camera socket, a slot containing a 32Gb memory card, and the GPS antenna socket. At this point, there are a couple details to note.
The USB-C power cable, which we ran from the passenger side (because that's where the TIPM is) needs to go to the left. No worries, there's plenty of cable. But... it has a 90 degree bend, so the cable will not stick up. That's great. Except that the cable MUST come from the left. Otherwise the 90 degree bend covers the socket for the rear camera cable. I wasn't going to re-route everything, so I looped the wire around. A couple zip ties will clean it all up when I'm done. Next, the rear camera cable. This also has a 90 degree bend. We know the power cable interferes on the drivers side, so I have it coming in from slightly to the rear of mirror. It would interfere with access to the memory card slot if it came from the passenger side. Finally, the GPS antenna plugs in. My third suggestion to the folks at Wolfbox is to maybe rethink these sockets.
So with everything plugged in, it's time to power it up. Wait. No rear camera detected? What? So I start looking. Turns out the plug for the camera is... not right. I e-mailed Wolfbox. I freely admitted that I didn't know if I had stepped on it or something stupid during the install, and offered to pay for a replacement. They said no worries and mailed me another cable. That meant another week waiting. Fortunately, you can turn off the smart mirror (or unplug the power) and it is a perfectly good conventional rearview mirror.
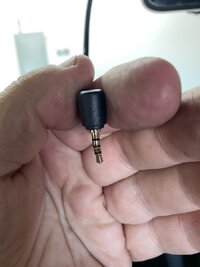
Once the replacement cable arrived, I simply used the old one to pull the new one through and plugged it in. And I will say I am very impressed.
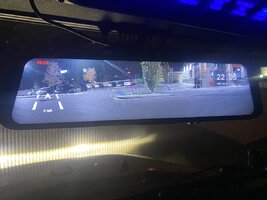
The rear camera has a wide angle lens. The field of view is wide enough that it pretty effectively eliminates blind spots. By the time the rear bumper of the average size vehicle disappears from the mirror, the front of the car is at your outside mirror. You can see it from your peripheral vision. This is wonderful. It does mean it'll take some practice judging distance for objects behind you. You can adjust the aim of the camera some by swiping on the mirror, so I am going to experiment a bit. I think if I aim the camera down a little more, swiping down will allow me to see the spare tire, which will simplify depth perception.
I finished the install just in time to go see the Great Lyric Poet and Philosopher Rodney Carrington perform. If you're so uncultured as to not know this mans work, he's the brilliant mind behind such classics as Show Them To Me, the romantic ballad Burning Sensation, the thoughtful and philosophical Titties & Beer, and the unforgettable Dear Penis. So I didn't take the above photo until after. It was taken in a dark parking lot and shows how good the cameras night vision is.
Over all, 5 stars. Would definitely recommend. Same for the mirror.
[Edited to update]
The rear camera mount is quite adjustable. I tilted it down one notch. This provided a great image in the rearview.
![IMG_5633[1].JPG IMG_5633[1].JPG](https://wranglerjkforum.net/data/attachments/122/122843-db04a328e5c119e5cc7f35921bb4d8b1.jpg?hash=2wSjKOXBGe)
And dragging my finger top to bottom on the mirror makes it easy to judge distance.
![IMG_5632[1].JPG IMG_5632[1].JPG](https://wranglerjkforum.net/data/attachments/122/122844-58dc63256151b5c67bbbb7f647d5173f.jpg?hash=WNxjJWFRtc)
I'm your host, Rowdy, and I might have a caffeine problem.

Let's get started.
I'm pretty sure that nobody, ever, anywhere in the world, has said "man, the visibility out the rear of these JK Wranglers is awesome!" Between the glass-mounted rear wiper motor, spare tire, and 3rd brake light, it's pretty crowded back there. Relocating the brake light to accommodate larger wheels and tires doesn't exactly help.

So what to do? As usual, the aftermarket has answers.
There are a number of high-end cars on or coming to market that replace all of the mirrors with cameras. Even budget-minded Kia is joining in. So after some time spent researching, I ordered THIS. The Wolfbox G840S. As usual, I will talk about installing this specific item, but other models or brands will likely be very similar.

The G840S currently sells for $120 on Amazon. It provides front and rear HD cameras, GPS compass, speed, and location information (but not navigation), loop recording, and has impact sensors to trigger recording of events when the vehicle is parked. The box comes with everything needed for an installation - the smart mirror and mounting straps, GPS antenna, rear camera and cable, power outlet adapter, a trim panel tool, and a fairly well done owners manual.
My immediate thought was "why the heck would anybody install this and plug it into the power outlet? This is clearly intended as a permanent installation, so doesn't hard wiring it make more sense?" The owners manual deals with this. Just send an email to the included address with your Amazon (or whatever) order number and they will send you a free hardwire kit. That's nice, but it does mean waiting. It took 5 days to get that kit. You could certainly use the power outlet adapter while you wait, but I don't like kludges. So, that was the first delay. I did suggest to Wolfbox in my email that they consider replacing the adapter with the hardwire kit as the default or, better yet, include both options in the box. That's my first suggestion for improvement.

I don't know what the installation instructions say to do first, because I'm a Macho He-Man, so I never read them.
My first step was running the power. To get the wiring into the engine bay, use the trim removal tool to pop out the panel on the passenger side of the dash. If you don't have one, you can use a small flathead screwdriver, but be careful not to damage the panel. At the top of the space behind this panel, you will see a hole that has been filled with expanding foam. This provides an easy way to pass wires out of the passenger compartment. There is one of these on the drivers side too, if you ever need access on that side.

There are, obviously, multiple methods of getting wires through here. My solution was very high tech. I poked it with a sharp stick.
The hole is maybe 1/2" in diameter. The power wire has two fuse connections on the end. I taped them to the stick, but the resulting bundle was too thick to pass through the hole. So I taped the middle of the wire to the stick, pulled that bundle through, and then pulled the rest of the wire through.

At this point, let me caution you to be sure which end you're taping to the stick. Because if, after wiggling and jiggling to get the connection end through the little hole, you discover that you just pulled the USB-C end through into the engine bay, you're going to feel stupid. Don't ask how I know, just take my word for it.
The mirror needs to be on when you're driving, so it needs a switched power source. But in order to shut down everything except the impact sensor recording, it also needs a constant source. It does have a power level sensor, so if your battery drops to 11V it will turn off to avoid leaving you stranded with a dead battery. The hardwire kit includes two fuses to make these connections. They are, unfortunately, not the sort that allow you to piggyback on an existing fuse. Nor can they be replaced. If they blow, you will need to splice in a replacement. This is my second suggestion to the folks at Wolfbox.
So we need two empty fuse slots. The JK TIPM is not exactly packed with empty fuse slots. You could replace the fuse in an existing circuit, but you'd need to be certain that the combined load was lower than the single fuse.
I spent some time reading the diagram and confirming things with my multimeter, and I ended up using M4 (constant) and M9 (switched). Your mileage may vary. Check your local listings. Void where prohibited. In the picture, you can also see the much nicer, dual fuse piggyback connector supplied by Voswitch.

There is a small power converter circuit box on the cable to drop the vehicles 12V power to the 5V used by the mirror. Installed the way I did it, this box ends up inside the cabin, behind the end panel of the dash. If you come from the engine bay into the cabin, it'll be right behind your battery. I used a couple zip ties to secure it so it wouldn't rattle. Then run the USB-C end of the cable (the one you DID NOT run into the engine bay by mistake...) up behind the A Pillar trim and across the top of the windshield, tucking it behind the trim as you go. I found this easier to do if I unhooked the front of the Freedom Panel. No need to remove it, just disconnect the front edge so you can lift it enough for your sausage fingers to fit in there.
While you're in there, mount the GPS antenna. I used 3M foam tape to stick it on the dash, right next to the passenger A pillar. Run the wire right alongside the power wire.
![IMG_5631[1].JPG IMG_5631[1].JPG](https://wranglerjkforum.net/data/attachments/122/122842-50fa902f7a547b40a6e60910cdbefeb6.jpg?hash=UPqQL3pUe0)
Next up: the rear camera. It can be mounted pretty much anywhere you like. I think it is most commonly placed above the rear license plate, but since the JK plate is way over to the side, this seems less than ideal. I have seen people mount cameras on the third brake pedestal, aimed through the wheel. My choice was centered on the roof, under the rear light bar. I used the supplied 3M double sided tape to mount it, then used that as a template to drill a couple screw holes. The hardtop is two layers with a gap between them at the rear, so there is no concern for the screws poking into the rear of the cabin. The foam tape should seal just fine, but I also put a dab of clear silicone on both screws. No leaks allowed. I then used a hole saw to provide passage for the wire into the cabin. I drilled this a few inches forward, where the hardtop is single layer. Because lining up the holes in the double layer part would be a pain. I used a rubber grommet to seal the hole, and I filled the top with clear silicone. Again, no leaks allowed.


Now we need to run the video cable from the camera to the mirror. I've been through this a couple times, wiring the rear light bars on our Jeeps, and it's not difficult. The OEM wiring for the wiper motor and such comes down the drivers side and under the carpeting. I've read a lot of how-to articles that recommend taking off the plastic trim around the rear down-leg of the roll cage. Don't bother. You can just pop the carpeting out from under the lip of the body and get enough room. Route the cable up into the rear seat floor, then put the carpet back in place. From the rear floorboard, use your fingers and a trim tool or screwdriver to tuck the wire under the plastic door sills. At the front, tuck it behind the kick panel. Pop out the end panel of the dash (just like you did on the passenger side for power) and run the wire up through that, behind the A pillar trim, and across the top of the windscreen.

Just FYI, that's my Hi Lift jack mount in that picture. Super nice. And since it's inside, I don't worry about the jack growing legs while I'm in a parking lot.

That's not a How To I intend to write. If you can't manage that install without a guide, you shouldn't be driving.
Now it's time to mount the heart and soul of the thing - the Smart Mirror. The mirror has a forward facing camera mounted on the drivers side. This means it is somewhat wider than the OEM mirror, and that it will be mounted offset to the drivers side to allow for the camera. It is mounted over your existing mirror using what are, basically, rubber bands. That doesn't sound very secure, but if you look at the unboxing photo, you will see that they are actually pretty robust rubber bands. If they stretch over time, they will be easy to replace. If that happens, I will think of a better way. Once mounted, you just need to plug in the three cables and you're good to go.

Across the top from left to right, you will find the USB-C power socket, the rear camera socket, a slot containing a 32Gb memory card, and the GPS antenna socket. At this point, there are a couple details to note.
The USB-C power cable, which we ran from the passenger side (because that's where the TIPM is) needs to go to the left. No worries, there's plenty of cable. But... it has a 90 degree bend, so the cable will not stick up. That's great. Except that the cable MUST come from the left. Otherwise the 90 degree bend covers the socket for the rear camera cable. I wasn't going to re-route everything, so I looped the wire around. A couple zip ties will clean it all up when I'm done. Next, the rear camera cable. This also has a 90 degree bend. We know the power cable interferes on the drivers side, so I have it coming in from slightly to the rear of mirror. It would interfere with access to the memory card slot if it came from the passenger side. Finally, the GPS antenna plugs in. My third suggestion to the folks at Wolfbox is to maybe rethink these sockets.
So with everything plugged in, it's time to power it up. Wait. No rear camera detected? What? So I start looking. Turns out the plug for the camera is... not right. I e-mailed Wolfbox. I freely admitted that I didn't know if I had stepped on it or something stupid during the install, and offered to pay for a replacement. They said no worries and mailed me another cable. That meant another week waiting. Fortunately, you can turn off the smart mirror (or unplug the power) and it is a perfectly good conventional rearview mirror.

Once the replacement cable arrived, I simply used the old one to pull the new one through and plugged it in. And I will say I am very impressed.

The rear camera has a wide angle lens. The field of view is wide enough that it pretty effectively eliminates blind spots. By the time the rear bumper of the average size vehicle disappears from the mirror, the front of the car is at your outside mirror. You can see it from your peripheral vision. This is wonderful. It does mean it'll take some practice judging distance for objects behind you. You can adjust the aim of the camera some by swiping on the mirror, so I am going to experiment a bit. I think if I aim the camera down a little more, swiping down will allow me to see the spare tire, which will simplify depth perception.
I finished the install just in time to go see the Great Lyric Poet and Philosopher Rodney Carrington perform. If you're so uncultured as to not know this mans work, he's the brilliant mind behind such classics as Show Them To Me, the romantic ballad Burning Sensation, the thoughtful and philosophical Titties & Beer, and the unforgettable Dear Penis. So I didn't take the above photo until after. It was taken in a dark parking lot and shows how good the cameras night vision is.
Over all, 5 stars. Would definitely recommend. Same for the mirror.
[Edited to update]
The rear camera mount is quite adjustable. I tilted it down one notch. This provided a great image in the rearview.
![IMG_5633[1].JPG IMG_5633[1].JPG](https://wranglerjkforum.net/data/attachments/122/122843-db04a328e5c119e5cc7f35921bb4d8b1.jpg?hash=2wSjKOXBGe)
And dragging my finger top to bottom on the mirror makes it easy to judge distance.
![IMG_5632[1].JPG IMG_5632[1].JPG](https://wranglerjkforum.net/data/attachments/122/122844-58dc63256151b5c67bbbb7f647d5173f.jpg?hash=WNxjJWFRtc)
Last edited:


