On todays episode of Getting Dirty with the Dog, we're going to upgrade the door handles in a 2013 Wrangler Unlimited Rubicon..
I'm your host, Rowdy, the Worlds Most Enthusiastic Dog. And this is my friend Lucy, the cross-eyed Siamese. Let's get started.
Jeep saw fit to load our JK Wranglers up with a LOT of exterior plastic. I think this is...less than ideal. The plastic fades in the sun, and if you want it to look nice you have to constantly put something on it. I've already replaced the plastic bumpers and fender flares, and it's always an improvment.
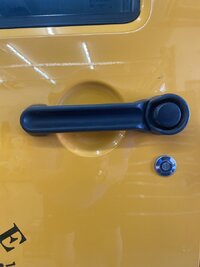
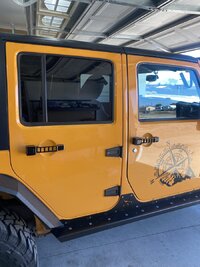
The other thing is, to me, that Wranglers are square. And the round door handle doesn't match that general squareness. Fortunately, the good folks at Xprite offer THIS alternative.
I think the square shape looks great, and since they're aluminum, they've got to be stronger.
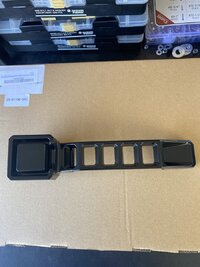
Xprite includes 5 handles, rubber gaskets, mounting hardware, and a 1 page instruction set with good color pictures.
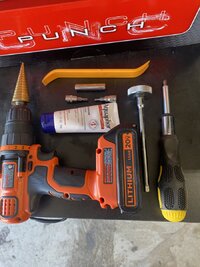
Tools needed for this installation are: 8mm socket and extension, Phillips head screwdriver, 3mm hex key, T25 Torx bit, T9 Torx bit, trim removal tool, a drill, and your choice of bit. I used a stepped bit, but you could just as easily use a standard bit, a spade bit, or a hole saw. Some of you may be wondering about the Aquaphor. I'll explain it in a minute, but it's not what you and your dirty mind are thinking.
Start by removing the panel off any door. You will need to use your trim tool (or a flat screwdriver, if you're careful and/or not worried about marring the plastic) to remove the colored trim piece on the armrest. The bolts are fake, so pop it out and set it aside. Use your Phillips head screwdriver to remove the two screws hidden by the fake screws. Pull the inner door handle like you're opening the door. Now reach in behind it, grab the little tab, and pop off the plastic cover sitting behind the handle. Grab your T25 Torx bit. The panels have three torx screws you will need to remove. One is behind the inner handle. On the front door, there is one at the bottom of the forward edge, and one on the bottom edge, under the pocket. The rear doors have one behind then handle, one at the top rear corner, and one at the bottom front. Once all the screws are out, you need to pop the clips loose. This is a brute force thing. If you have never taken off interior panels, it's going to sound like you're breaking the panel. You're not. Probably. Be brave, but not too brave. An alternative is a tool like this:
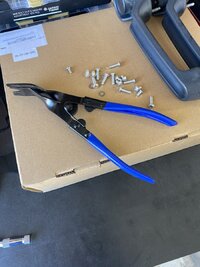
It is intended for popping out plastic rivets, but it can be used for these clips, too. Once the clips are loose, if you pull the bottom out and smack upwards, it will come loose from the window trim. Disconnect your power windows, if you have them. Pull the door handle and slip the panel off to reveal...
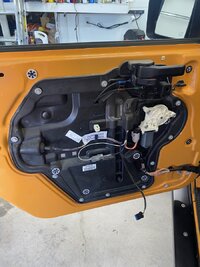
One of the handle bolts is behind that rubber grommet. Pull it out. Access to the other is blocked by this panel. You can unbolt it, but there is a silicone seal behind it, and if you remove the panel, you will need to scrape off and replace that seal. This is the area that interests us.
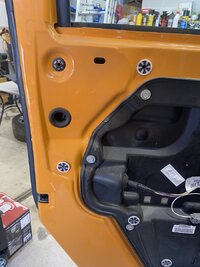
And this is where we are going to drill. You will want a hole about 1" in diameter. Personally, this is the part that always makes me the most nervous. If you are working on an Unlimited, the rear doors have some wiring right there where you're going to drill. The hole those wires pass through is almost where you need it to be. I used a screwdriver through the hole to push the wires out of the way and drilled an overlapping hole with my stepped bit. A little caution and you will be fine.
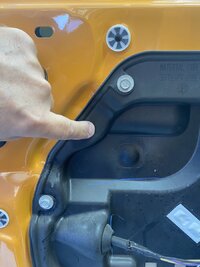
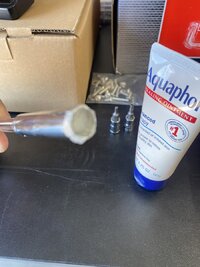
So now we have access to the nuts, but I think we all know that if we drop those things inside the door, we're going to have a bad day. This is where the Aquaphor comes into play. You can use lots of things. Vaseline, toothpaste, double sided tape... The idea is just to make sure you can extract the nut without it falling out of the socket. Just put a bit in the socket, and Bobs you uncle!

When you remove the old handle, take a moment to clean. You're never going to get the new handle to perfectly cover. I squirted a little adhesive remover on the door (because that's what was on my bench) and wiped it with a shop towel.
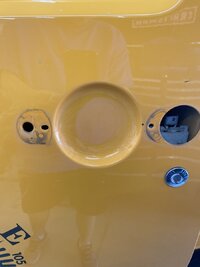
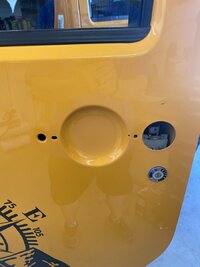
Comparing the OEM and Xprite handles, you will note that the OEM has bolts embedded in the handle. I think this is one thing the OEM did better than Xprite (I do not know if other companies embed the bolt or not). Xprite provides 3mm hex bolts. You will need to feed them through from the inside. As with the socket, just dip your bolt heads into your goop and they won't fall off.
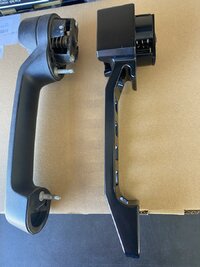
Reverse the procedure to install the new handles. I test the handle before I put the inner panel bits back on. Because I'm not very trusting. But they all work perfectly. And I think look much better than the OEM.
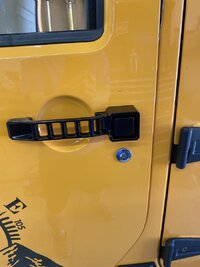
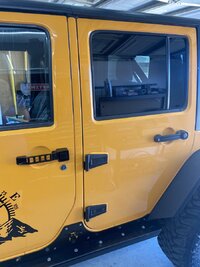
One caution. Xprite includes rubber pads to go between the handle and the door. Some might be tempted to leave them off. Do not. The handles are aluminum. Aluminum is strong, light, and doesn't rust. But it does oxidize. And doing so when in contact with steel is...nasty. Have you ever noticed that Wranglers can have nice paint, but the hinges are all cracked and bubbly? That is because the aluminum hinges are mounted directly to the steel body. This is precisely why my hinges have been replaced with steel ones from Smittybilt. That, and the contrast of the black looks awesome.
Now move on to the tailgate. The doors are pretty easy. The tailgate is a bit of a pain. And the instructions only address the doors. Open the tailgate and you will see two grommets that look like they're right over where the bolts are. That's great! No, it's not. Don't bother pulling them out. All that is behind them is the latch mechanism, and I wouldn't remove that unless you enjoy realigning body panels. Next to the lying grommets is a plastic grill. Pop that out with your trim tool. Directly behind you will see the socket for your third brake light wiring. And if you look in and over to the side, you can see the nuts we need to remove.
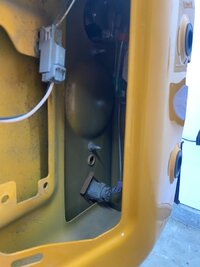
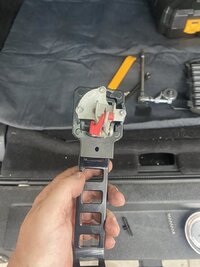
There's not a lot of room in there. I think the best tool choice would be an 8 year old with tiny hands. Since I am 6'1" and 220, my hands are not all that small, and none of the grandkids were around when I needed them, the useless wretches! So a little time, patience, a few words I shouldn't say in front of those grandkids anyway, and it's out. Notice the mechanism bolted to the handle. You're going to need to transfer this to the Xprite handle. There are three T9 torx screws, and a friction fit connection to the latch mechanism. If you can get the torx screws out without removing that latch connection or scratching the paint, you're a better man than I. I popped it loose. This is a brute force technique.
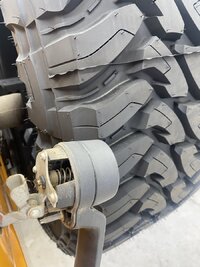
The Xprite handle has a shorter spring. I do not know how important that is, but I chose to swap the OEM spring on and avoid the question. The Xprite bar and spring is held on by two 3mm hex bolts. The OEM connection is 3. My OCD would not allow it to be assembled with 2 Hex and 1 Torx screw, so I reused all three of the OEM screws.
Reverse the procedure. There still isn't much room in there, so unless that 8 year old has shown up, be prepared to swear some more. Test your new handles, and put your tools away. And clean up all the Vaseline before anyone sees it and thinks you're into something weird.


I'm your host, Rowdy, the Worlds Most Enthusiastic Dog. And this is my friend Lucy, the cross-eyed Siamese. Let's get started.

Jeep saw fit to load our JK Wranglers up with a LOT of exterior plastic. I think this is...less than ideal. The plastic fades in the sun, and if you want it to look nice you have to constantly put something on it. I've already replaced the plastic bumpers and fender flares, and it's always an improvment.

The other thing is, to me, that Wranglers are square. And the round door handle doesn't match that general squareness. Fortunately, the good folks at Xprite offer THIS alternative.
I think the square shape looks great, and since they're aluminum, they've got to be stronger.

Xprite includes 5 handles, rubber gaskets, mounting hardware, and a 1 page instruction set with good color pictures.
Tools needed for this installation are: 8mm socket and extension, Phillips head screwdriver, 3mm hex key, T25 Torx bit, T9 Torx bit, trim removal tool, a drill, and your choice of bit. I used a stepped bit, but you could just as easily use a standard bit, a spade bit, or a hole saw. Some of you may be wondering about the Aquaphor. I'll explain it in a minute, but it's not what you and your dirty mind are thinking.

Start by removing the panel off any door. You will need to use your trim tool (or a flat screwdriver, if you're careful and/or not worried about marring the plastic) to remove the colored trim piece on the armrest. The bolts are fake, so pop it out and set it aside. Use your Phillips head screwdriver to remove the two screws hidden by the fake screws. Pull the inner door handle like you're opening the door. Now reach in behind it, grab the little tab, and pop off the plastic cover sitting behind the handle. Grab your T25 Torx bit. The panels have three torx screws you will need to remove. One is behind the inner handle. On the front door, there is one at the bottom of the forward edge, and one on the bottom edge, under the pocket. The rear doors have one behind then handle, one at the top rear corner, and one at the bottom front. Once all the screws are out, you need to pop the clips loose. This is a brute force thing. If you have never taken off interior panels, it's going to sound like you're breaking the panel. You're not. Probably. Be brave, but not too brave. An alternative is a tool like this:

It is intended for popping out plastic rivets, but it can be used for these clips, too. Once the clips are loose, if you pull the bottom out and smack upwards, it will come loose from the window trim. Disconnect your power windows, if you have them. Pull the door handle and slip the panel off to reveal...

One of the handle bolts is behind that rubber grommet. Pull it out. Access to the other is blocked by this panel. You can unbolt it, but there is a silicone seal behind it, and if you remove the panel, you will need to scrape off and replace that seal. This is the area that interests us.

And this is where we are going to drill. You will want a hole about 1" in diameter. Personally, this is the part that always makes me the most nervous. If you are working on an Unlimited, the rear doors have some wiring right there where you're going to drill. The hole those wires pass through is almost where you need it to be. I used a screwdriver through the hole to push the wires out of the way and drilled an overlapping hole with my stepped bit. A little caution and you will be fine.

So now we have access to the nuts, but I think we all know that if we drop those things inside the door, we're going to have a bad day. This is where the Aquaphor comes into play. You can use lots of things. Vaseline, toothpaste, double sided tape... The idea is just to make sure you can extract the nut without it falling out of the socket. Just put a bit in the socket, and Bobs you uncle!


When you remove the old handle, take a moment to clean. You're never going to get the new handle to perfectly cover. I squirted a little adhesive remover on the door (because that's what was on my bench) and wiped it with a shop towel.


Comparing the OEM and Xprite handles, you will note that the OEM has bolts embedded in the handle. I think this is one thing the OEM did better than Xprite (I do not know if other companies embed the bolt or not). Xprite provides 3mm hex bolts. You will need to feed them through from the inside. As with the socket, just dip your bolt heads into your goop and they won't fall off.

Reverse the procedure to install the new handles. I test the handle before I put the inner panel bits back on. Because I'm not very trusting. But they all work perfectly. And I think look much better than the OEM.


One caution. Xprite includes rubber pads to go between the handle and the door. Some might be tempted to leave them off. Do not. The handles are aluminum. Aluminum is strong, light, and doesn't rust. But it does oxidize. And doing so when in contact with steel is...nasty. Have you ever noticed that Wranglers can have nice paint, but the hinges are all cracked and bubbly? That is because the aluminum hinges are mounted directly to the steel body. This is precisely why my hinges have been replaced with steel ones from Smittybilt. That, and the contrast of the black looks awesome.
Now move on to the tailgate. The doors are pretty easy. The tailgate is a bit of a pain. And the instructions only address the doors. Open the tailgate and you will see two grommets that look like they're right over where the bolts are. That's great! No, it's not. Don't bother pulling them out. All that is behind them is the latch mechanism, and I wouldn't remove that unless you enjoy realigning body panels. Next to the lying grommets is a plastic grill. Pop that out with your trim tool. Directly behind you will see the socket for your third brake light wiring. And if you look in and over to the side, you can see the nuts we need to remove.

There's not a lot of room in there. I think the best tool choice would be an 8 year old with tiny hands. Since I am 6'1" and 220, my hands are not all that small, and none of the grandkids were around when I needed them, the useless wretches! So a little time, patience, a few words I shouldn't say in front of those grandkids anyway, and it's out. Notice the mechanism bolted to the handle. You're going to need to transfer this to the Xprite handle. There are three T9 torx screws, and a friction fit connection to the latch mechanism. If you can get the torx screws out without removing that latch connection or scratching the paint, you're a better man than I. I popped it loose. This is a brute force technique.

The Xprite handle has a shorter spring. I do not know how important that is, but I chose to swap the OEM spring on and avoid the question. The Xprite bar and spring is held on by two 3mm hex bolts. The OEM connection is 3. My OCD would not allow it to be assembled with 2 Hex and 1 Torx screw, so I reused all three of the OEM screws.

Reverse the procedure. There still isn't much room in there, so unless that 8 year old has shown up, be prepared to swear some more. Test your new handles, and put your tools away. And clean up all the Vaseline before anyone sees it and thinks you're into something weird.

Last edited:


